MONDAY MORNING...


Hi all you lovely people...

Hope you all enjoying this Loooong weekend...At our place 3 days were divided amongst 3 of us. So Saturday was mine and obviously I chose 'Shopping' (which I should have chose today), Sunday was ZOO time for our little one and Today is my Hubby's day, which has started late by getting up at 9.45 AM, so you can guess how its going to progress....may be a beach or some drive...God alone knows...

Last week was good, I did buy some make-up, that I shared in a preview post. They look good to me, lets see...Nothing much to share except that this week is last of my son's school and that little monster is too excited for summer camps and summer fun, which makes me nervous.....lol!! Ok, enough rambling....hungry stomachs are yelling and so much chaos....gtg...

have a good day...

xoxo
dazzling...sparkling...me

Storyboard Art by Michael Borkowski: Turok, Venture Bros, Scooby, Ice Age

Wanna see some quality action/adventure storyboard art? Check out:
Storyboard art from animated Turok Son of Stone
by Michael Borkowski


Michael also has storyboards from The Venture Brothers, Scooby-Doo, and Ice Age 3.
Good stuff to look at if you're interested in drawing storyboards for action shows! It's all at:

BEAUTY BUYS -- DIOR, NARS, MAC, TARTE


'BEAUTY BUYS' is another term coined for the infamous 'HAUL'. Its just the
list of things I buy and the ones you will hear me 'yak', 'blab', 'review'
about in next few posts!!! Call this a 'Preview'...

Nothing makes me Happy like Shopping does...Seriously, Malls are the most amazing 'Wonders of the World'

I did get a chance to see the new MAC Collection 'To the Beach' and Obviously, I didn't get to see Marine Life in person, because it was Sold-out!!! I didn't even bother to swatch anything in the store, as I had forgot to take my camera, so no swatches too. The only thing that I was tempted to buy from this new collection was that flat topped brush 130 I believe, but then thought its better to wait till it hits CCO!
I did end up getting 2 things.

Goodies I picked from MAC:

1. Grease paint stick in 'DIRTY' (Collection that was released in the last century)
2. Eyeshadow in 'RETROSPECK' as B2M (Xinarox has been telling me to get this since ages!!)

From Sephora I did pick a few stuff and I SUCK because I didn't buy any makeup during the Sephora sale and today ended up hauling at full price...Such a LOSER!!!

Goodies I picked from Sephora:

1. DIORSKIN SHIMMER by DIOR
2. ORGASM ILLUMINATOR by NARS
3. PENNY LANE CREME BLUSH by NARS
4. PARK AVENUE PRINCESS (MATTE) BRONZER by TARTE

I will review and swatch things when I have used them enough, but as of now, I am pretty happy with my purchase, so excited to try everything!!!!

Hope you guys are enjoying this long, lovely weekend...:)

Storyboard Video: How Many Poses?

One of the most commonly asked questions about storyboarding is "How many poses do I need to draw?" The answer usually depends on how important the action is in the telling of your story.


For example, let's say a character is tying a tie. If this action is just a little bit of business, not an important part of the story, you could probably do it in just two poses: in the first pose, the character has his hands on the knot -- and then in the second pose, the tie is tied.

But if you are storyboarding an instructional video about how to tie a tie, you may need a couple dozen poses. That's a pretty extreme example, but it gives you a good idea about how to think about how many poses you need to draw.


This is the first of three videos that look at how much to pose out an action. Since there are always a number of different things going on in any storyboard drawing, there are also many other topics covered: staging, silhouettes, using the cutaway shot to advance a gag or story point.

This scene stands out for me as one of the most fun sequences I've ever had the chance to draw... sometimes it's a lot of fun just to get silly. It's also the best example of using a great vocal performance to fuel the drawings; Amy Poehler was on fire when she recorded the track for this episode!


If you missed any of the previous posts, here are the links:

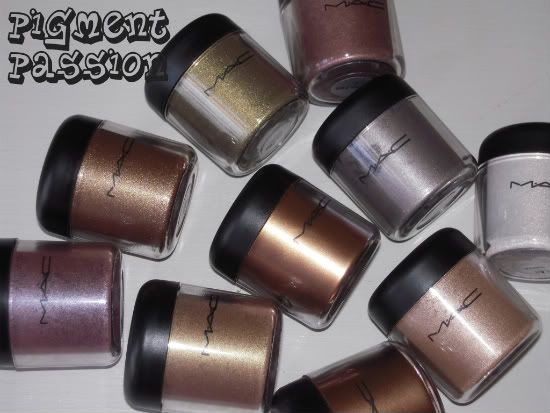
PIGMENT PASSION -- MAC VANILLA


PIGMENT PASSION is a series that will feature MAC Pigments, their texture, the
ways I use them and all the fun stuff. One pigment will be posted every
Friday and I will try to share whatever pigment colors I own.


Vanilla Pigment (with bright flash)

This is one of the most loved pigment by 'Pigment Lovers'. They say, its a 'must-have'. Lets see how....

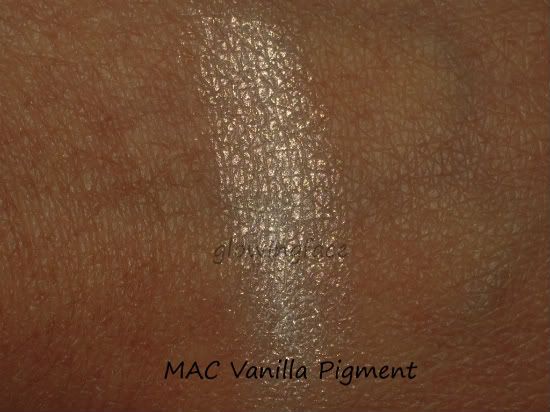
The color of the pigmnet though appears white, it technically not white. It has Gold shimmers in it and that Gold is not a Yellow Gold, its a Peachy Gold. This shimmers are finely milled and that makes this pigment very easy to work with.


Vanilla Pigment (muted flash light)

This pigment is not frosty, which makes it more wearable and would work for many people with different skin tones and age groups. Its always flattering to wear something that has a glowy sheen, rather than frosty shimmer.


Swatch of Vanilla Pigment

The swatch above shows a lovely goldeny highlight. Its pretty!

Ways I use Vanilla Pigment:

1. Mix in my regular body lotion, to make a shimmery, body lotion. I like it to use this way, especially in spring and summer. When the sunlight hits my hands and legs, I like the sheen that the lotion gives.

2. Mix just the tiniest amount in my face moisturizer and apply it all over the face. It gives the same effect that MAC Strobe Liquid Lotion gives, or for that matter any shimmery lotion would give. It reflects light beautifully. The best thing is I can control the amount of shimmer I need.

3. As a cheek-bone Highlighter. It gives a nice sheen, but is messy and difficult to use. Messy because its loose powder and difficult because I am unable to get equal amount of product in each dab. Also if I need to use a fan brush, there is no room in the cap to 'smoosh' in the product.
This might leave a Whitish cast if over applied, but I don't think anyone will over apply. It gives sheen with very less application, as its pretty concentrated and potent.

4. As inner corner highlight. I like the over all effect it gives, when applied to inner corners.

5. On the brow bone as highlighter. I don't use this often though. This is pretty close to Solar -white eyeshadow and I love to use that just because its easy to use.

Ways this pigment can be used, but I don't use:

1. Mixing with foundation to get a glowy look. I tried and it didn't work for me.

2. On hair, with hair spray. I never tried this.

3. On nails, by mixing with clear nail polish. Never tried with this color.

4. On centre of the lips, to give it a plumping effect, by mixing it with clear nail polish. It works, but I am too lazy to do this procedure.

Its a great multi- tasking product and the color Vanilla is very Versatile. I can understand why it becomes must have for many people. If you are a make-up artist, this is DEFINATELY a 'MUST - HAVE'.
Even though I have a cheek Highlighter and a brow Highlighter and shimmery lotion, I still keep a small sample jar of Vanilla pigment when I travel. It comes handy many times and you can even use fingers if necessary to apply this.

Please let me know if you know any other ways to use this particular pigment. Its wonderful to know how much more you can do with a product!

Super Sentai Art by Melody Cisinski

I don't know much about the artist (Because her web page is in French) but Melody Cisinski's artwork is so much fun to look at!
Much more wonderful artwork at:

MAC -- TO THE BEACH FACECHARTS


TO THE BEACH

EYES
Warm and lightly define brows by applying Fling and Lingering Eye Brows. Create a soft highlight under the brows by using 224 Tapered Blending Brush to apply Arena Eye Shadow. Pat on Copper Cream Colour Base with 217 Blending Brush to the eyelid. Contour the eye by using Tete-A-Tint and Sand & Sun Eye Shadows to the crease with 224 Tapered Blending Brush. Define lashes with Dazzle Lash in Black Dazzle.

CHEEKS
Create a soft flush of colour on cheeks by blending Get-Away Powder Blush.

LIPS
Protect and condition lips by applying Lip Conditioner. Softly define lips with Temperature Rising Lip Pencil and use Lipstick in Thrills to shade mouth. Top off with Flurry of Fun Lipglass.


SWEET AND PUNCHY

EYES
Enhance brows by using Lingering Eye Brows. Use 239 Eye Shading Brush to highlight the browbone with Brule Eye Shadow. Apply Float On By Eye Kohl followed by Humid Eye Shadow to the eyelid using a 242 Shader Brush. Add more definition to the eye with 224 Tapered Blending Brush and apply Sweet & Punchy Eye Shadow to the outer corners of the crease. Line the upper lashline with Float On By Eye Kohl and Humid and Sweet & Punchy Eye shadows using a 219 Pencil Brush. Finish the eyes with several coats of Black Fix Studio Fix Lash.

CHEEKS
Dust on Beach Bronze Crème Bronzer and Get-Away Bronze Powder Blush to cheeks.

LIPS
Contour lips with Oak Lip Pencil. Apply Beachbound Lipstick and follow with Easy Lounger.


SAND AND SUN

EYES
Fill in brows using Penultimate Brow Marker. Using 242 Shader Brush pat on Groundwork Paint Pot under the browbone. Apply Sand & Sun Eye Shadow to the eyelid with a 217 Blending Brush, and follow to the crease. Define the upper lashline by using 266 Small Angled Brush to apply Brown Down Eye Shadow. Finish the eyes with a generous amount of Black Fix Studio Fix Lash.

CHEEKS
Lightly warm cheeks by using Beach Bronze Crème Bronzer.

LIPS
Hydrate lips with Lip Conditioner SPF 15. Softly define lips with Life?s A Breeze Lip Pencil and use Lipstick in Lazy Day to shade mouth. Dab on Easy Lounger Lipglass to complete the look.


FIRECRACKER

EYES
Shape and define brows by using 266 Small Angled Brush to apply Lingering Eye Brows and Soba Eye Shadow. Highlight browbone with Vanilla Eye Shadow and a 239 Eye Shading Brush. With the same brush apply Sand & Sun Eye Shadow on the eyelid. Switch to 217 Blending Brush to blend Firecracker Eye Shadow over the crease of the eye. Apply Rapidblack Penultimate Eye Liner through the upper waterline using a 217 Blending Brush. Elongate and define lashes with Dazzle Lash in Black Dazzle.

CHEEKS
Create a soft glow by on the upper cheekbones with Get-Away Bronze Powder Blush and Marine Life High-Light Powder.

LIPS
Contour the center of the lip with Temperature Rising Lip Pencil before applying Lipsticks in Thrills and Beachbound. Finish with a dab of Splashing Lipglass.


ROSEMARY AND THYME

EYES
Define and shape brows by using Espresso Eye Shadow with 266 Small Angled Brush and Clear Brow Set. Create a soft highlight under the brows by using 224 Tapered Blending Brush to apply Dazzlelight Eye Shadow. Use 219 Pencil Brush to apply Sand & Sun Eye Shadow over the eyelid. Contour the eye by using 228 Mini Shader Brush to blend Firecracker Eye Shadow through the crease. Define the upper lashline with Rosemary & Thyme Eye Kohl and Sweet & Punchy Eye Shadow using a 219 Pencil Brush. Coat lashes with Plush Lash in Plushblack.

CHEEKS
Colour cheeks with Get-Away Bronze Powder Blush and Marine Life High-Light Powder.

LIPS
Line lips with Subculture Lip Pencil followed by Beachbound Lipstick. Add a layer of Flurry of Fun Lipglass.


EASY LOUNGER

EYES
Enhance brows by using Lingering Eye Brows and Penultimate Brow Marker. Use 217 Blending Brush to apply a soft highlight under brows with Sand & Sun Eye Shadow. Use 252 Large Shader Brush to apply Firecracker Eye Shadow over the eyelid. Contour the crease by using 224 Tapered Blending Brush to blend Saddle Eye Shadow. Define the upper lashline with Dipdown Fluidline, applied with 266 Small Angled Brush. Finish the eyes by applying two to three coats of Black Fix Studio Fix Lash.

CHEEKS
Lightly warm cheeks with Beach Bronze Crème Bronzer. Blend in with Marine Life High-Light Powder to cheekbones.

LIPS
Define and contour the lip with Life?s A Breeze Lip Pencil. Fill in with Lazy Day Lipstick followed by Easy Lounger Lipglass.


TEMPERATURE RISING

EYES
Shape and define brows by using 266 Small Angled Brush to apply Charcoal Brown Shadow. Create a bright highlight under brows by using 224 Tapered Blending Brush to apply Orb Eye Shadow. Using a 252 Large Shader Brush sweep the lid with Painterly Paint Pot and Sand & Sun Eye Shadows. Add more depth by using Firecracker and Brown Script Eye Shadows with a 222 Tapered Blending Brush. Line the upper waterline with Float On By Eye Kohl followed by Smolder Eye Kohl to the lashline. Slather lashes in coats of Coal Black Pro Lash.

CHEEKS
Colour cheeks with Get-Away Bronze Powder Blush and Marine Life High-Light Powder.

LIPS
Line lips with Temperature Rising Lip Pencil and apply Beachbound Lipstick. Finish off by smoothing Flurry of Fun Lipglass

New Storyboarding Video -- Staging for Movement/More on Backgrounds

After taking a little break to cleanse the palate, we're back with another storyboarding commentary video (Links to the all the videos are at bottom of this post).


The topic of today's video is staging for movement; it's critically important to plan ahead and leave just the right amount of room in your composition for your characters to act out the scene with the most impact.

Click on the full-screen button (at the bottom right
of the video
), to make the video nice and BIG!

In these storyboard panels, Bessie starts a series of actions that are going to escalate into a cute little comedy bit. The action starts out when Bessie and Portia are sitting next to each other on the bench. Bessie is so enthusiastic that she knocks Portia out of the way and start frantically putting together cosmetic kits.

Anytime there's a lot of movement in the scene, it's important to leave enough room for the action to really be visible.


Other topics in this video include the use of the "Same As" pose indication, more on background design, the "start pose," and one more example of "The Magic of the Cutaway."

If you missed any of the other posts, here are the links:

Doodles Duck and the Magic Lamp

cartoon rabbit by funny animal cartoonist howie post
Doodles Duck by Howie Post
From Hollywood Funny Folks #19, April 1949
Doodles Duck in Hollywood Funny Folks #19
Funny animal comics cartoon rabbit and duck Hollywood Funny Folks #19 - Page 22 Doodles Duck in Hollywood Funny Folks #19 - Page 23 Hollywood Funny Folks #19 Funny animal comics cartoon rabbit and duck Hollywood Funny Folks #19 Funny animal comics cartoon rabbit and duck Doodles Duck in Hollywood Funny Folks #19 - Page 26
cartoon alligator by howie post
cartoon alligator elephant duck monkey by howie post

NARS - LUSTER BLUSH (Review/Swatch)


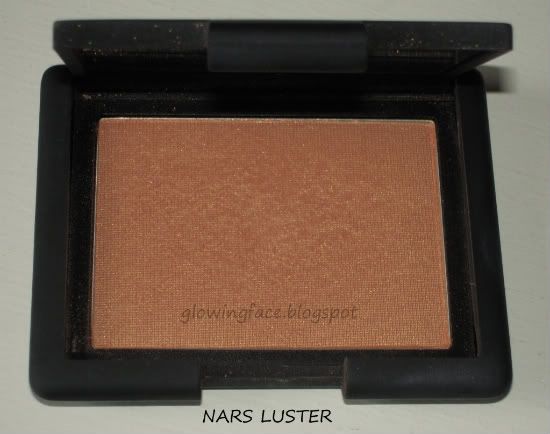
NARS Blush in LUSTER

This is a FANTASTIC color!!!
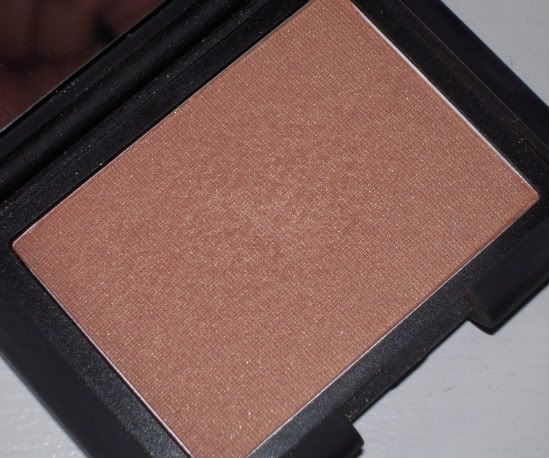
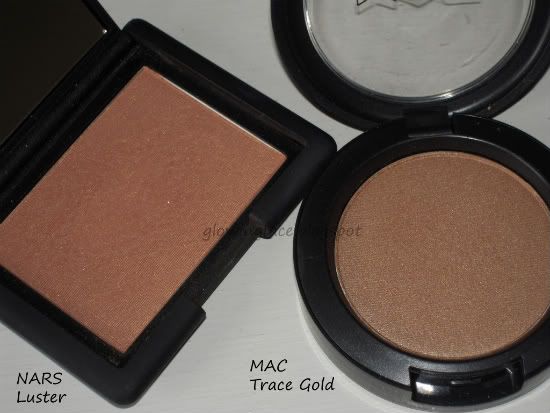
NARS Luster is a Peachy, Brown, Apricot Goldeny color. These color descriptions from me are pretty dumb! I just describe what I see. As per the website, the color is Sheer Golden Apricot.


Close -up of NARS Blush in LUSTER (Different Light set up)

It has subtle shimmer, which gives a gorgeous sheen without being OTT. The pigmentation is nice and the color is sheer and buildable. I personally like to use a Blush brush, like MAC 129, and buff it to give a well blended look. I don’t like to use any kind of skunk brush for this color. Its sheer, unlike NARS Desire, which NEEDS to be used sparingly. I find a blush brush helps to deposit good amount of Luster color and helps it to blend like a dream.


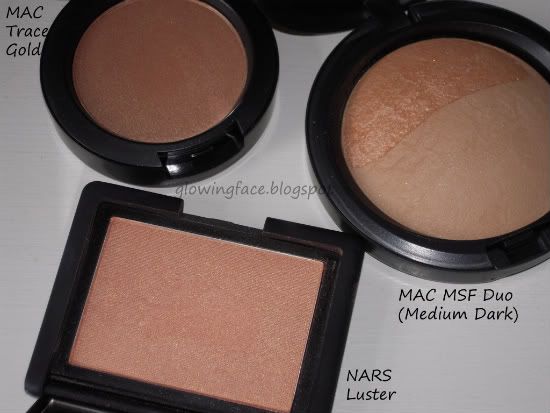
Comparison of NARS Luster and MAC Trace Gold

I am NC40/42 and it just incorporates a peachy/apricot color. Its not pink for sure. There is some hint of brown in the blush and its well balanced brown, so it would not give that ‘sun-burnt’ look.
It can also be used as a highlighter over matte, warm blushes from same color Family.


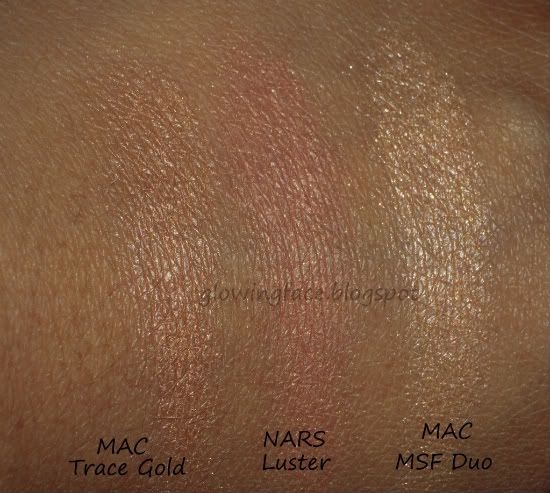
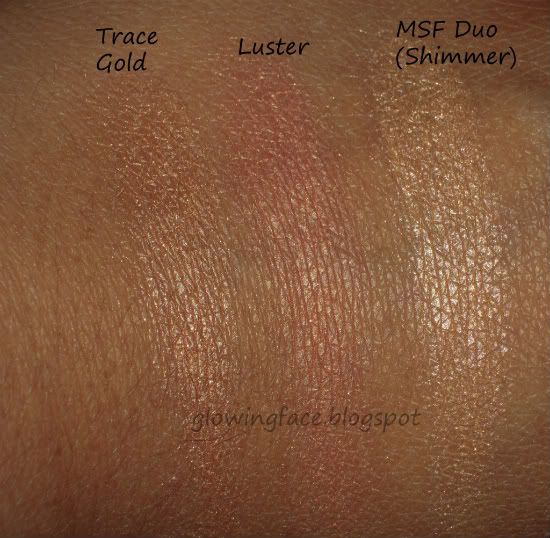
Swatches of MAC Trace Gold, NARS Luster and MSF Duo (Medium Dark)

It’s a perfect blush for summer. It compliments my warm/Olive skintone so well!! At times I can get away without using any bronzer as this gives color and that contoured effect aswell. I don’t know how peach or brown it would turn on very pale skin tones, but I see this working for wide range of skin tones and various age groups. It is a lovely color and can be worn to work aswell.

The packaging is usual NARS Black, rubbery casing with a mirror. Like every NARS blush, it lasts for decently long time.


Swatches of MAC Trace Gold, NARS Luster and MSF Duo (Medium Dark)

I just love this color to bits…
Believe me, this Blush is as AWESOME…not PAINFULLY BORING like this review.

I personally feel as a collector, make-up lover and Beauty Blogger, I need to keep buying and trying new products, but as a consumer, I feel I have found some really good colors for myself, that make me look pretty and presentable. I don’t need anymore. Every single of my Fav Blushes from Deep Throat, Nuance, Luster, Rome, Desire etc exist in the permanent line from their respective brands. Its worth saving and investing in a color that flatters you most rather than accumulating colors that are just ’hyped’ and ’mediocre’.

Warm Soul is another color that looks absolutely promising and that’s on my list next…………
Disclaimer: This is not a paid or sponsered Review. Its my personal experience with the product and my honest opinion.

MAC - TRACE GOLD BLUSH (Swatch/Review)

A self proclaimed GOLD SUCKER…I could not believe my blog did not had an exclusive post on Trace Gold!!!


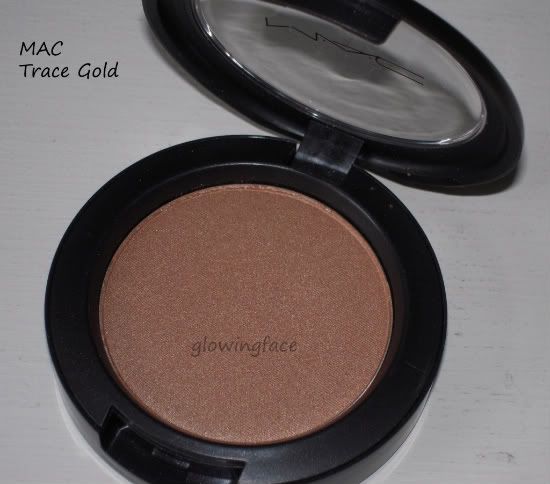
MAC Trace Gold Blush

This is a sheer tone shimmer blush. It has all the qualities that I was expecting in a highlighter with Gold tones. I personally don’t like this as a blush on myself. It is pretty sheer on me, and when I try to build the color, the cheeks end up looking bronzy and the shimmer level increases. This kind of ‘Bronzy look’ looks pretty, but something that I won’t wear everyday. It’s a summer blush and all year Highlighter for warm toned coral, orange, apricot blushes.


Comparison between NARS Luster, MAC Trace Gold, MSF Duo Medium Dark

This is my second favorite GOLD Highlighter, first being that shimmer side of the MSF duo which was limited edition. They are pretty close, though the shimmer side has less bronzy tones and they have different texture aswell.


Swatches of NARS Luster, MAC Trace Gold, MSF Duo Medium Dark (shimmer side)

This looks pretty close to Otherwordly, which was limited edition, but this one is more wearable as the former one is more Metallic. I like the fact that Trace Gold has more Gold and less Brown/Bronze, which makes it a lovely Golden Highlight for skin tones like mine….but again, its not the best Color as Blush for me…

Disclaimer: I have purchased this Product and these are my personal experience.

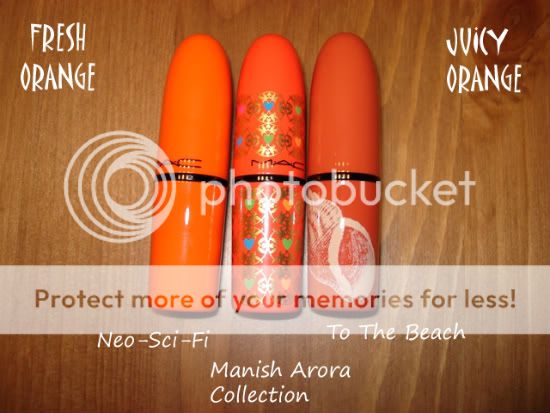
Choose your FAVORITE ORANGE!!


Pic Credit: Sussane (Specktra.net)

These are 3 Funky, Orange Packaging MAC gave us in past 2-3 years. Do you like Orange colored tube? Do you find it FUN or do you find it TACKY?
Choose in your Favorite ORANGE......

NEO-SCI-FI is my favorite. Its shiny, little tacky and pure, plain juicy Orange Color!!

This is just a Random, Fun Post.....

p.s: This is not my picture. If you read Specktra (which I know you all) you must be familiar with the name Sussane. She is a moderator on Spectra, an ardent make-up lover and very active on forums. She posted this picture in the swatches section.

MONDAY MORNING...


Hi friends...

I begin with Good Morning wish and an apology, for not updating my blog last week and MIA. I know, Nobody is waiting for some amazing, sneak peak from my blog, but still I respect my 252 Followers aka Friends who share same interest as me (make-up) and deserve an explaination.
I was just feeling tired and lazy. I just didn't had the inclination to do anything...Seriously!

Ok, so I have been lemming over those Lisa Taubes Chains, that is hugely popular on You Tube. They are pretty, wearable link chains, both in Gold and Silver. I like them a lot, but I just can't justify the price tag of around $135 for a single chain. Also its light weight, 12K or 14K Gold or Gold plated (not 100% sure) which makes is almost nil in resale value and zero investment as a jewelry. I am pretty confused............ I need to get some replicas...Any suggestions??

To the Beach collection is boring... MUFE HD blush is not working for me and I am low on Cash for any 'fun' purchases....I told ya, I am so Bored in General...

Hope you guys have a nice, creative, and happy week ahead....I will try to do something and get back on track....

xoxo,
dazzling....sparkling...me!!

Frank Frazetta - Famous Funnies comic book covers from the 1950’s

Frank Frazetta - Famous Funnies comic book covers from the 1950’s
All of the incredible artwork from Frank Frazetta's Buck Rogers Famous Funnies comic book covers is on display HERE in high-resolution scans:

http://bit.ly/Frazetta-Comics

These nine covers are pure pulp-adventure space-opera masterpieces! Much more of Frazetta 1950’s comic book work is collected in this book:

Bowling and Breakfast

The bowling was much better than the breakfast.

Hey Arnold Crew Photo Circa 2006


Hey Arnold - Gerald
The Hey Arnold crew gathered in Woodbridge Park for a group photo right after we got our crew jackets in late 1995 or early 1996.
Hey Arnold Crew PART 1
Standing: (L to R) Jay Lender, Scott Ninneman, Joe Purdy, Brad Carow, Dave Warden, Micah Wright, Jim Leber, [??], Clint Bond, Dave Lyman, Brian Mark

Crouching
: (L to R) Jamie Mitchell, Suzanne Benton, Mike Lessa, Stephanie ‘Henning’ Robertson, Lora Lee, Antoinette Stella, Karen Shaffer
--------------------------
Hey Arnold Crew PART 2
Standing: (L to R) Dave Lyman, Brian Mark, Kurt Dumas, Doug Appleton, Stark Howell, Caesar Martinez, Teale Wang, Donna Smith, Sherm Cohen, Heather Adams, Kelly Crews, Steve Socki, [?], Catherine Simmonds, Derek Drymon

Crouching: (L to R) Antoinette Stella, Karen Shaffer, Kenji Notani, Hugh MacDonald, Joey Paul, Steve Lowtwait, George Chialtas, Robert Cseko, Vito Curcuru, Lisa Fuson, Dawn HersheyRyan Slater, Jim Lara, Tim Parsons

Front: Hey Arnold creator and Fearless Leader Craig Bartlett!
-------------------------------------------
Hey Arnold Crew PART 3
Standing: (L to R) Derek Drymon, Rob Porter, Ted Seko, Bill Hutten, Dan Povenmire, Karin Stover, Mary Harrington, Jay-?, Larry Leichliter

Crouching: (L to R) Jim Lara, Tim Parsons, Miyuki Hoshikawa, Chris Robertson, Tuck Tucker, Chris Hink
----------------------
CLICK pic below
for really HUGE high-resolution panorama

Hey Arnold Crew Photo 1996
Great show, great crew, great learning experience.


Hey Arnold
was the first show where I was able to really grow creatively, from Storyboard Revisionist to Director over the course of the first three seasons.
Many from this crew went on to SpongeBob SquarePants (Derek Drymon, Jay Lender, Dan Povenmire, myself, Brad Carow, Teale Wang, Frank Weiss, Clint Bond, Tuck Tucker, Ted Seko)


Spongebob SquarePants
…and Catdog (Rob Porter, Derek Drymon, George Chialtas)CatDog
Tricia Garcia spent the next 13 years directing on
King of the Hill, and Caesar Martinez was a designer there, too!
king_of_the_hill
law_and_order_criminal_intent Antoinette Stella became a prime-time TV writer, Producer…most recently Supervising Producer of Law & Order Criminal Intent (one of my favorite shows).

Kurt Dumas, Dan Povenmire and Chris Robertson have had long runs on Family Guy, and of course Dan went on to become co-creator of Phineas & Ferb!

phineas-and-ferb Family Guy

Jamie Mitchell and Kelly James are working on Special Agent Oso for Disney special agent oso

Lately, Derek Drymon, Kelly Crews, Nick Jennings and Larry Leichliter have been making Adventure Time!

Adventure Time
And Hey Arnold creator Craig Bartlett has been making Dinosaur Train with Joe Purdy for Henson/PBS!
DinosaurTrain Logo dinosaur-train dinosaurs characters
     …That’s a lotta talent!
I’m sure I’ve left out a lot, so please remind me in the comments!